When it comes to bathroom plumbing, few components are as crucial—and often overlooked—as the toilet flange. This simple circular fitting is responsible for securing the toilet to the floor and creating a watertight connection to the drainpipe. Yet many homeowners run into persistent toilet leaks, rocking toilets, foul odors, or recurring wax seal failures simply because the toilet flange height is not set correctly. Achieving the proper flange height is not just a technical detail; it’s one of the most important factors in ensuring your toilet remains stable, leak-free, and durable for years to come. In this complete guide, we break down everything you need to know about the ideal toilet flange height, how to check yours, and what to do if it’s too high or too low.
What Is the Correct Toilet Flange Height?
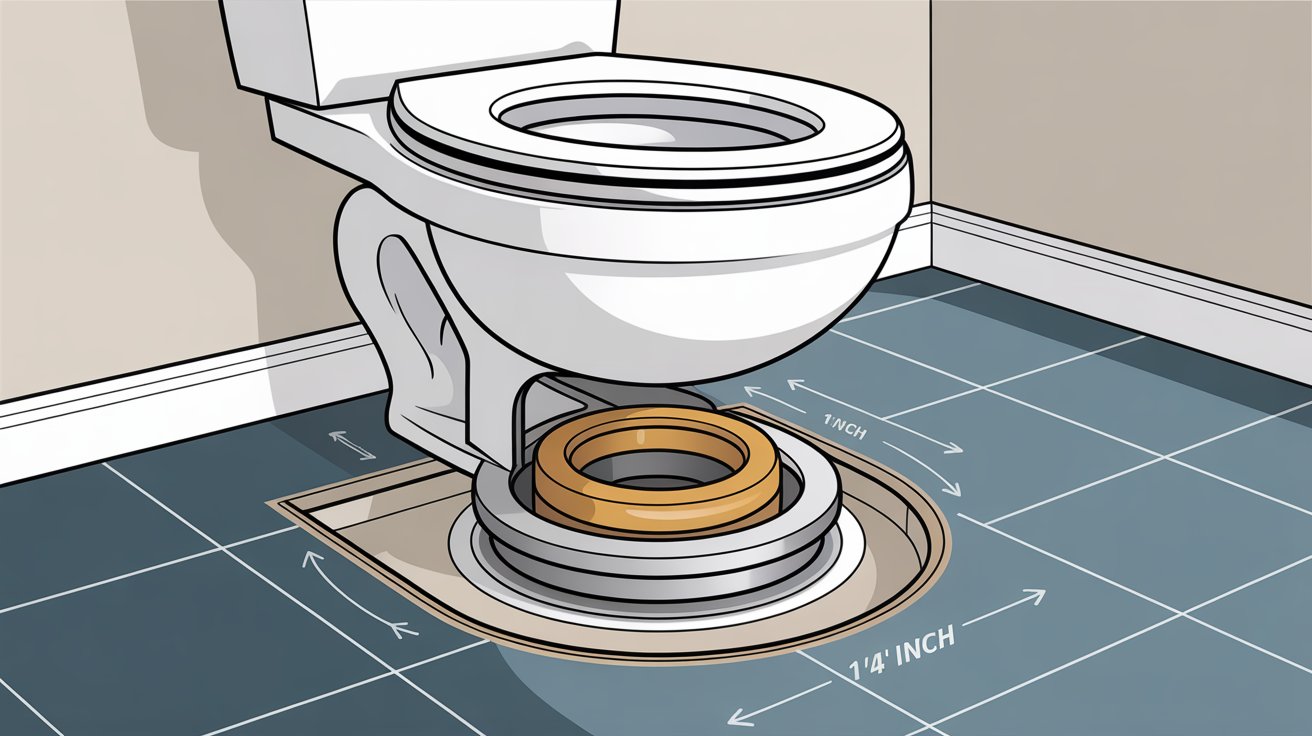
The industry standard for toilet flange installation is clear: the top of the toilet flange should sit about ¼ inch above the finished floor. This slight elevation allows the wax ring—or alternative seals—to compress properly when the toilet is installed, creating a tight, leak-free connection. If the flange is lower than the finished floor, the wax may not seal well, resulting in water seepage or sewer gas leaks. Conversely, if the flange is too high, the toilet may rock or fail to sit flush with the floor, potentially cracking the toilet base or creating gaps that compromise the seal.
This height standard applies across all common flooring types including tile, vinyl, laminate, hardwood, and stone. No matter what flooring renovation you plan—or have already completed—the finished surface should surround the flange. The flange is then anchored firmly to the subfloor, ensuring long-term stability. Understanding this one measurement makes every part of installation easier and significantly reduces the risk of future plumbing headaches.
You might also like


How to Measure Toilet Flange Height Accurately
Measuring toilet flange height is a straightforward process, but accuracy is crucial. Start by ensuring the toilet is removed and any old wax is scraped away to expose the flange entirely. Next, place a straightedge or level across the finished floor surface next to the flange opening. Using a ruler or tape measure, measure the vertical distance from the top of the flange to the bottom of the straightedge. If the measurement reads approximately ¼ inch above the floor, you’re in ideal territory. If it measures zero, the flange is perfectly flush, which can be workable but not optimal. A measurement below zero indicates the flange is sitting too low and needs corrective action, while more than ¼ to ½ inch above the floor may classify it as too high.
This measurement ensures that your toilet will sit securely on the floor, rather than relying solely on the wax ring to stabilize it. A properly measured flange height also helps you plan the right materials—extenders, thicker wax rings, or shims—before reinstalling the toilet.
Signs Your Toilet Flange Height Is Incorrect
Many homeowners don’t realize they have a flange height issue until problems begin to surface. One of the most common signs is a rocking or wobbly toilet, which indicates the base isn’t sitting firmly on the floor. Another red flag is water pooling around the toilet base after flushing—this typically means the wax ring isn’t sealing properly due to height discrepancies. Persistent sewer odors coming from the bathroom may also suggest the flange height is too low, allowing gas to escape around the wax ring. Over time, moisture from a poor seal can cause floor damage, soft spots, or rot in the subfloor, turning a small issue into a costly repair. If you experience any of these symptoms, checking the toilet flange height should be one of your first steps.
What to Do If Your Toilet Flange Is Too Low
Install Toilet Flange Extenders
A flange that sits below the finished floor surface is one of the most common problems encountered during bathroom renovations. Fortunately, flange extenders—sometimes called spacers—offer a simple, reliable fix. These plastic rings stack on top of your existing flange to raise its height by ¼ inch, ½ inch, or more depending on what you need. They are secured using longer screws to fasten everything tightly to the subfloor. Extenders are one of the best methods because they provide a solid, permanent adjustment without relying solely on wax.
Use an Extra-Thick Wax Ring (When Appropriate)
If the flange is only slightly low—flush with the floor or just a bit below—an extra-thick wax ring may provide adequate sealing. These oversized rings compress more and can bridge small height gaps. However, wax rings should never be stacked, and they should not be used to compensate for severely recessed flanges. Wax remains soft and can shift or deform over time, especially under toilet movement, so this solution should be reserved for minor height corrections.
Raise or Replace the Entire Flange
In cases where the flange sits dramatically below the finished floor, raising or replacing the flange may be the most dependable solution. This involves cutting the drainpipe, installing a new section of pipe, and placing a new flange at the correct height. While more labor-intensive, it guarantees long-term security and often prevents recurring leaks.
Pros and Cons
Extenders are highly reliable and easy to install. Extra-thick wax rings are quick but not a universal fix. Replacing the flange is the most permanent solution but also the most involved. Selecting the right approach depends on how far off the height is and the materials you’re working with.
What to Do If Your Toilet Flange Is Too High
Trimming or Cutting Down a PVC Flange
If your toilet flange sits too high—often ½ inch or more above the finished floor—the toilet may not sit securely, leading to rocking and poor wax compression. With PVC flanges, it’s sometimes possible to trim down the upper lip to reduce the height. This must be done carefully to avoid damaging the sealing surface, but when executed correctly, it can bring the flange closer to the ideal ¼-inch mark.
Building Up the Floor Surface
Another reliable solution is raising the surrounding floor thickness. This might involve adding cement board, additional tile, or layers of vinyl plank until the finished floor meets the correct height relative to the flange. This method works best during renovations, especially when selecting new flooring materials.
Using Shims for Minor Height Issues
When the flange is only slightly too high, plastic toilet shims can help stabilize the toilet. These wedges ensure the toilet sits flat on the floor even if the flange lifts it slightly. Once shimmed properly, the toilet can be caulked to hide gaps and create a finished look. While this approach can work well, it relies heavily on proper wax ring compression and may not be ideal for severely elevated flanges.
Risks of Ignoring an Over-Height Flange
Allowing a high flange to remain untreated can lead to cracked toilet bases, recurring leaks, or a toilet that simply will not stabilize. Addressing the issue promptly ensures the toilet performs reliably and avoids hidden water damage beneath the flooring.
Installation Guidelines for Different Flange Materials
PVC / ABS Flanges
Modern bathrooms typically use PVC or ABS flanges due to their durability and ease of installation. They are simple to solvent-weld to the drainpipe and allow for easy height adjustments using extenders or replacement parts. When working with these materials, always ensure the flange is firmly anchored to the subfloor.
Cast-Iron Flanges
Older homes often contain cast-iron plumbing. Adjusting these flanges may require cutting cast iron, replacing lead seals, or installing repair rings. While more challenging to work with, achieving the correct toilet flange height is still essential.
Stainless-Steel Hybrid Rings
Some flanges feature plastic hubs with stainless-steel rings. These are corrosion-resistant and ideal for long-term durability. Their height adjustments follow the same principles as PVC flanges, making them versatile in various bathroom settings.
Best Practices for Setting Toilet Flange Height During Remodeling
Bathroom remodels often involve changing flooring materials, which can significantly alter the final toilet flange height. When installing tile or thick stone flooring, always plan the flange placement ahead of time. The flange should not be anchored until the finished floor is installed—or at least until its thickness is accounted for. If you remove old flooring and install a thinner material, you may end up with a flange that sits too high. Conversely, installing thicker tile may require extenders to bring the flange back to the correct level. Careful planning during remodeling prevents flange height problems that lead to future repairs.
Common Toilet Flange Height Mistakes to Avoid
Many flange height issues stem from avoidable mistakes. One major error is installing the flange before flooring is finished, which often results in a flange that is too low once tile or laminate is added. Another common mistake is stacking two wax rings, which creates an unstable seal that frequently fails. Some homeowners fail to anchor the flange securely to the subfloor, causing movement that breaks the wax seal over time. Others ignore early signs of trouble—like toilet rocking—only to discover extensive floor damage later. Avoiding these mistakes ensures your toilet remains secure, leak-free, and dependable.
Frequently Asked Questions
Can a toilet flange be level with the floor?
Yes, but it’s not ideal. A flange level with the floor may seal with an extra-thick wax ring, but raising it slightly is the preferred solution.
What if the flange is below the floor?
A flange below the floor almost always needs extenders or a full flange replacement to ensure proper sealing.
Do wax-free seals change the required height?
Wax-free seals can be more forgiving, but achieving the standard ¼-inch height still ensures the best performance.
How much variation is acceptable?
Small differences of ⅛ inch can be workable, but anything over that typically requires adjustment.
Conclusion
Ensuring the correct toilet flange height is essential to maintaining a stable, leak-free, and long-lasting toilet installation. Whether you’re renovating, repairing, or installing from scratch, paying attention to the flange’s position—especially aiming for ¼ inch above the finished floor—can save you from costly plumbing issues down the road. By understanding the signs of incorrect height, knowing how to measure properly, and choosing the right methods to correct any issues, you can achieve a flawless bathroom setup that performs reliably for years.
Do Read: Lil Maceee Age: Everything You Need to Know About His Real Age and Rise to Fame


![[pii_email_07cac007de772af00d51]](https://technewmaster.com/wp-content/uploads/2023/05/Understanding-and-Resolving-the-pii_email_07cac007de772af00d51-Error-A-Comprehensive-Guide-120x86.webp)


