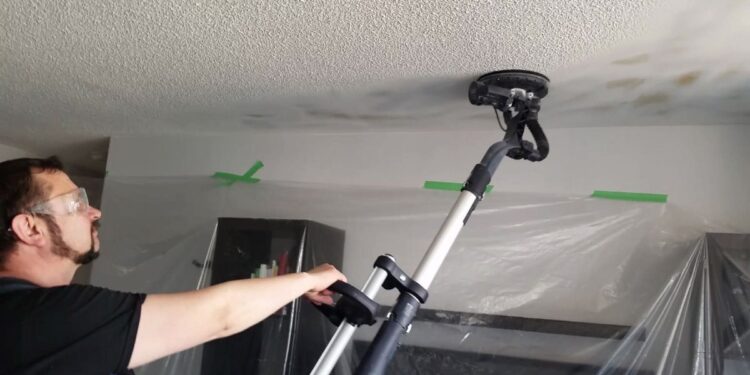
If your home has popcorn ceilings, it may be time to remove them. This dated texture can trap cobwebs, spiders, and dust. Plus, it can exacerbate respiratory symptoms in some people.
It’s a messy project, but it can add value to your home and make it safer. Follow these tips to help make the job easier:
Test for Asbestos
A popcorn ceiling made before 1980 may contain asbestos, a toxic material that can cause lung cancer and other health problems when inhaled. Because of this, testing for asbestos in your ceiling is important before beginning the removal process.
It is best to hire a professional to perform the testing and any actual work, as it is something other than what the average homeowner should handle. Popcorn ceiling removal services use specialized tools and equipment for this job.
Wear a dust mask and protective clothing to ensure you are properly protected. It is also a good idea to wear gloves and use a brush to sweep away any debris from the floor before starting to scrape.
Ensure all furniture is removed from the room before you start work. This is because it can get in the way and become wet during the process. You should also remove light fixtures unless you plan to reinstall them after the project. If you reinstall them, wrap them in plastic and seal them to prevent asbestos fibers from becoming airborne during the work.
Cover the Floors
If your ceiling texture contains asbestos, it’s best to hire a professional abatement contractor to remove it. Removing it yourself could release asbestos fibers into the air and put you at risk of contracting a deadly disease like mesothelioma.
Even if you’re not concerned about asbestos, covering the floors during your popcorn ceiling removal project is important. You’ll want to use plastic drop cloths so they don’t get soaked with water from spraying the ceiling. Moving furniture out of the room is also a good idea so it doesn’t get in your way while scraping the ceiling.
Covering any light fixtures or switches with plastic sheeting is also a good idea. If you leave them in place, they might get sprayed with water, which will be difficult to clean up. If you have recessed “can” lights, stuff newspaper or rosin paper inside of them so they don’t get wet.
Remove All Fixtures
If you plan on painting the ceilings once the popcorn texture is removed, consider removing any light fixtures or ceiling fans before beginning the project. This will reduce cleanup time and save you the hassle of covering and masking them.
During popcorn ceiling removal projects, you will use power tools, scrapers, and sanders, which can create quite a mess. If you’re uncomfortable working on the ceiling, hiring a professional can save you a lot of headaches and money.
If you decide to tackle the project, cover any furniture or carpeting in the room with 6-mil polyethylene plastic sheeting. Make sure the sheets overlap room edges by about a foot, and tape all edges securely. Posting asbestos warning signs and turning off heating and air conditioning systems is also important. This will help keep any contaminants from spreading to other areas of the home.
Prepare the Room
If your home’s dated, textured ceilings have you constantly polishing furniture or dusting; it may be time to consider taking on the project of removing them. A flat ceiling will make the room feel bigger and allow you to add crown molding for a finished look.
To prepare for popcorn ceiling removal, remove all furniture and cover everything you can’t move with plastic sheeting or drop cloths. You’ll spray water on the ceiling to soften the texture, and you don’t want to accidentally wet any electrical fixtures like lights or fans or the drywall underneath them. It would help if you closed the breaker box for safety.
Once you’re ready to start, using a respirator when removing the old texture is important. This will help prevent you from inhaling asbestos particles that will likely be released during the process. It’s also a good idea to enclose the space you’re working in with plastic walls and cover the floor with heavy-duty tarps or drop cloths.
Scrape the Ceiling
Before starting your popcorn ceiling removal project, preparing the room is best. Remove as much furniture as possible and cover the rest with a plastic tarp or drop cloth (not canvas; water soaks through it). Shut off power to any electrical boxes, and remove any light fixtures or ceiling fans you have.
Next, use a garden pump sprayer to moisten the ceiling. A wet ceiling comes off much easier with little dust, but don’t apply too much water; you don’t want to saturate or damage the drywall underneath.
Work in small sections and carefully scrape away the texture, careful not to gouge or nick the drywall. Round the edges of your putty knife or drywall scraper to reduce the likelihood of gouging. Catch the removed material in a tray or other container to reduce the floor mess you must clean up later.
Clean Up
Popcorn ceilings are a common feature in older homes. They can add to the style of a room, but they can also look dingy and outdated. It’s easy to freshen up old popcorn ceilings by simply painting them. However, removing the texture first makes the job much easier.
Depending on the type of texture, you may need to use a scraper or putty knife. It’s important to wear a dust mask while working on this project, as the texture can contain asbestos fibers that can cause lung problems.
Covering the floor with drop cloths or heavy-duty tarps. This will help prevent the mess from getting into your carpet and make cleanup much easier. It would help if you covered any air vents, electrical outlets, or light fixtures to avoid putting anything at risk of damage. Read more interesting articles on Tech new master


